
The content of the article:
▪️ How do I create an adult account on Google?
▪️ How do I create a child account on Google?
▪️ How do I switch between adult accounts and child accounts?
▪️ How do I make a child profile the default profile on the browser?
▪️ How can I use Google Families to monitor my child’s internet activity?
▪️ How can I manage the privacy settings on our Google accounts?
By creating a Google account, users have access to Google Drive cloud storage and a variety of office service, including:
Word processor;
Spreadsheet;
Presentation editor;
Photo editor;
The website editor and other programs.
These cloud-based services are completely compatible with Microsoft Office, allowing users to open and edit Word, Excel, and Powerpoint files online. Every document created using the Google cloud services can be saved on the computer in a variety of formats, including Microsoft Office.
A Google account can be used to quickly register on websites without any additional forms or e-mail confirmations.
When registering an account, there are certain restrictions for children under 13 years of age.
More information about these restrictions can be found here.
A child account on Google allows parents to:
Monitor their child’s activity on the internet;
Block inappropriate websites;
Control access to smartphone apps.
Parental approval is required to create a child account on Google. The parent must have a personal account on Google in order to approve the child’s account.
 HOW DO I CREATE AN ADULT ACCOUNT ON GOOGLE?
1.Go to google.com
2.Click “Sign in” on the top right corner of the browser.
3.In the new window, click “Create account”.
4.Choose “For myself” from the list of options.
5.Complete the form:
Enter your name and surname. They can be written in either Latin or Cyrillic script.
Create a username. The username should contain between 6 and 30 characters. It can contain Latin letters, numbers, and special symbols. Link to the Google username requirements.
Enter a password, then confirm your password in the next box. The password should contain at least 8 characters. These can include Latin letters, numbers, and special symbols. Link to advice from Google for creating a reliable password.

Click on the eye/checkbox next to the password bar. This will allow you to see the password that you have entered.

Take a screenshot of the information on your smartphone so you do not forget.
Click “Next”.
6.If your username has already been taken, you will see an error message.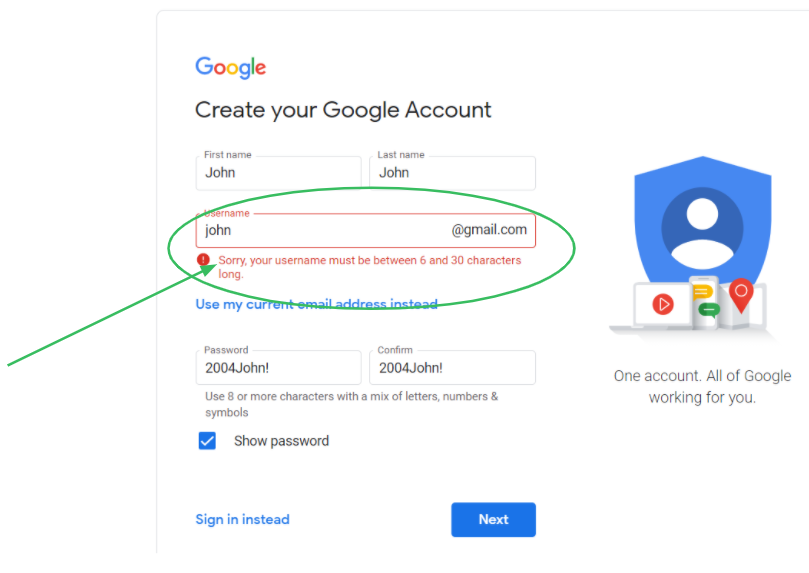
Choose a different username or use one of the suggestions. After changing your username, take another screenshot to remember the new information.
Click “Next” again to confirm the changes.
Complete the next form:
You don't need to provide a phone number or a backup e-mail. However, in some cases, the system may require a phone number. In this case, link it to your account and use the verification code.


Enter a date of birth. Pay extra attention when entering the year of birth. Parents must be 18 years or older.
After completing the form, click “Next”.

7.Next, you will see information regarding privacy and the terms of use. Familiarize yourself with them. If you would like to read the entire document, scroll down. At the end of the document, click “Confirm” to agree to Google’s terms and conditions.
8.All done! You will be taken back to the Google homepage. In the upper right corner, you will now see a circle with your first initial or photo.
 HOW DO I CREATE A CHILD ACCOUNT ON GOOGLE?
Parental approval is required to create a child account on Google. The parent must have a personal account on Google in order to approve the child’s account.
At the stage when we already have an adult Google account, let's create another account for the child.
1.On google.com, click the circular button on the upper right corner of your screen.
2.Click “Add another account” in the box that appears.
3.In the new window, click “Create account”.

4.Choose “For myself” from the list of options.
5.Complete the form:
Enter your name and surname. They can be written in either Latin or Cyrillic script.
Create a username. The username should contain between 6 and 30 characters.
Make the username as simple as possible for your child so that it is easy for them to log in to their account during lessons. Six letters are best.
The username can contain Latin letters, numbers, and special symbols. Link to the Google username requirements.
Enter a password, then confirm your password in the next box. The password should contain at least 8 characters. These can include Latin letters, numbers, and special symbols. Link to advice from Google for creating a reliable password.
Choose a short password for the child (8 characters). Only use letters and numbers for the password so it is easy to type during lessons.
Click on the eye/checkbox next to the password bar. This will allow you to see the password that you have entered.

Take a screenshot of the information on your smartphone so you do not forget.
Click “Next”.
6.If your username has already been taken, you will see an error message.
Choose a different username or use one of the suggestions. After changing your username, take another screenshot to remember the new information.
Click “Next” again to confirm the changes.
7.Complete the next form:
You do not have to provide a telephone number or a backup e-mail address. However, in some cases, the system may require a phone number. In this case, link it to your account and use the verification code.


Enter a date of birth. Pay attention to the year. It should match your child’s birth year.
After completing the form, click “Next”.

8.Enter your adult e-mail address to connect the child’s account to your own.
9.Next, you will see an agreement to process your child’s personal data. Familiarize yourself with this. If you would like to read the entire document, scroll down. At the end of the document, click “Confirm” to agree to Google’s terms and conditions.
10.Enter the password for your adult account to confirm your approval of the child account.
11.Familiarize yourself with the information regarding the management of your child's account, then click “Next”.
12.Familiarize yourself with the information regarding the management of a Family group. Confirm that you would like to create and manage your family group.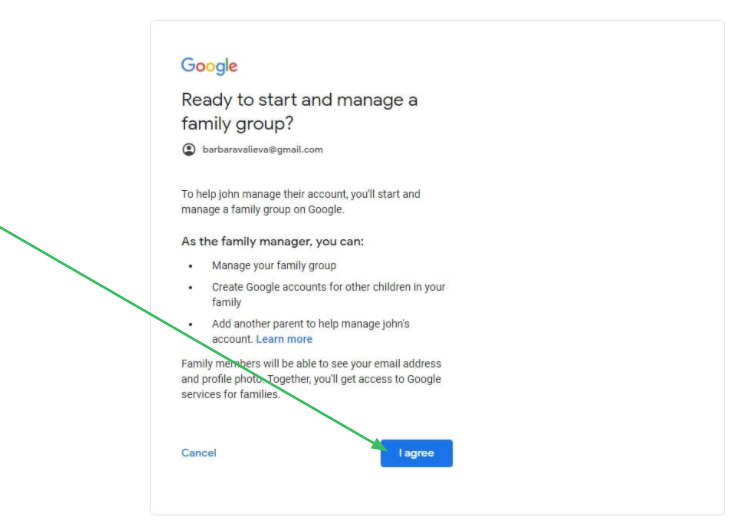
13.Verify the information that you have provided for your child’s account and click “Next”.
14.If you do not have a Google Play account, you will be asked to confirm your identity. Familiarize yourself with the information provided and click “Next”.
Confirm your approval. Fill in your credit card details. You can use a virtual card that was created the day you completed the form. There does not have to be any money on the card. Payment is not required for registration.
After completing the form, click “Accept”.
15.All done! You have created a child account!
 HOW DO I SWITCH BETWEEN ADULT ACCOUNTS AND CHILD ACCOUNTS?
1.You can switch between accounts by changing the current one in the upper-right corner of the Google homepage.
After switching, the avatar or letter of the name will change to the corresponding account you selected.
2.For the parental control settings to start working, both the parent and child accounts must be added to the list of users on the browser.
The list of users can be found to the right of the URL bar.
Add your account and your child’s account to the list of users. To do this:
a.Click on the icon to the right of the URL bar and in the box that appears, click “Add”.
c.You can also select the settings icon. A box will appear, displaying the Google Chrome users on your computer. Click “Add person”.

d.You can complete this step with your child. Ask them to choose a name and an avatar for their profile on the browser. In the next steps, we will link this profile to the previously created Google children's account.
You can create a desktop shortcut to your child’s profile by clicking “Add a desktop shortcut”.
However, it is better to make your child’s profile the default option to ensure that the restricted settings are enabled whenever the browser is opened. We will explain how to do this later in the guide.
After you choose a name and avatar for the profile, click “Add”.

e.You will then be invited to configure your profile settings. You can configure the settings manually or click “Already a Chrome user? Sign in”.
f.Enter your child's email address in the window that appears.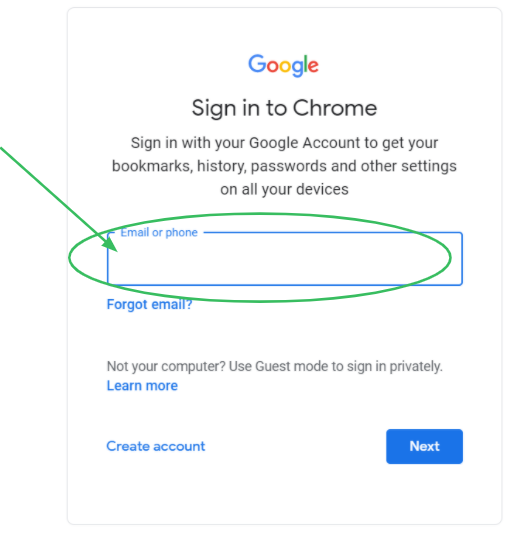
g.Click “Next”.
h.Enter password from Google account.
i.After entering password, click “Next”.
j.You can synchronize your account settings to all of your devices by clicking “Yes, I'm in”. Or you can skip this by clicking “Cancel”. The parental control settings will still work even if you do not synchronize your devices.
k.All done! You can see which profile you are using by looking at the avatar to the right of the URL bar.
l.To change profiles, click on the avatar and choose a profile from the list or add a new profile.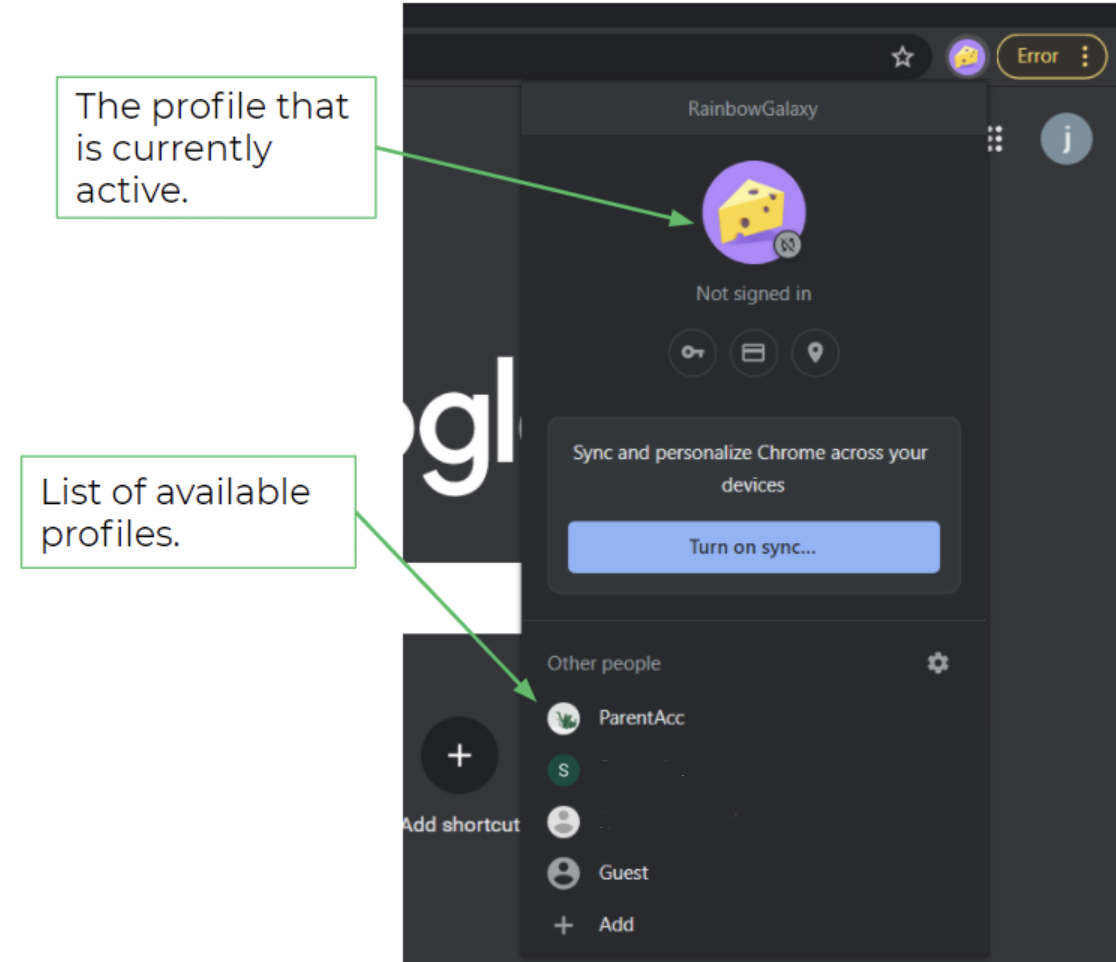
 HOW DO I MAKE A CHILD PROFILE THE DEFAULT PROFILE ON THE BROWSER?
The first profile created on the browser automatically becomes the default profile. If you added your child’s profile first, then the parental control settings will automatically be launched every time Google Chrome is opened.
What if you added the parent profile first?
Remove all of the profiles and start over. To remove the profiles:
1.Open the list by clicking on the avatar next to the URL bar. Click on the settings icon in the box that appears.
2.The list of profiles will be displayed in a new window. Place your cursor on one of the profiles and you will see three small dots in the upper right corner. Click on them.
3.A menu will appear. Click “Remove this person”.
Complete steps 2 and 3 until you have removed all of the user profiles. To recreate the user profiles, follow the instructions under “How do I switch between adult accounts and child accounts?”.
 HOW CAN I USE GOOGLE FAMILIES TO MONITOR MY CHILD’S INTERNET ACTIVITY?
1.Open www.families.google.com in the Google Chrome browser using the parent account. Learn how to switch to the parent profile on Google Chrome here.
2. You can also go to the family group settings via Google account management.

It will open a family group with your account as the family manager and your child’s account as a supervised family member. 
3.Click on the profile of the family member that you would like to monitor. Open the settings panel for the account.
You can change settings by selecting items from the list or you can go to “Account info”.
4.You can change your child’s information at any time by going to “Account info” and clicking on the pencil button.

5.Choose “Controls on Google Play” and set the necessary permissions. To set a restriction, choose a section and click the check mark on the right.
6.Place a mark by the permission option that you find most acceptable. Your changes are saved automatically.
7.To go back to the remaining sections, click on the various options on the menu.
8.Go through all of the menu options and choose your preferred parental control settings.
❗️ IMPORTANT.
For Algorithmics courses, it is important to allow students to log in to their account without sending a request to the parent account. To do this:
Choose “More” from the menu and go to account login permissions.

select the green dot next to “No, {Child’s Name} can log in to the account without my permission”

 HOW CAN I MANAGE THE PRIVACY SETTINGS ON A GOOGLE ACCOUNT?
If you do not want to share personal information with Google (more information about how Google uses your personal data here), you need to configure your privacy settings on each user account.
1.To access your account settings, open www.google.com, and click on the round button in the upper right corner.
2.In the menu that appears, click “Manage your Google Account”.
3.Find “Privacy & Personalization”. Open this section.
4.Look carefully at the list of options and adjust the privacy settings according to your preferences.
To switch sections, use the menu on the left side of the screen. A menu will appear when you click on the main page of any of the sections.
5.To prevent your information from being stored and processed, switch all of the options off.

We recommend paying particular attention to the following pages:
In the “My Activity and Timeline” section, you can receive comprehensive information about what data is being stored and processed by Google.